DIY Birdhouse with a Low Roof: How to Build It
A charming birdhouse can add a touch of whimsy to your garden and provide a safe haven for our feathered friends. Among the many styles, a birdhouse with a low roof boasts a unique aesthetic, inviting a delightful sense of coziness and charm. This guide will lead you through the construction process, enabling you to craft your own low-roofed birdhouse with ease.
Materials You'll Need
To embark on this woodworking project, gather the following materials:
- Wood: Select 1/2-inch thick pine, cedar, or redwood for durability and weather resistance.
- Wood glue:
- Wood screws: 1 1/4-inch and 1 1/2-inch lengths for secure assembly.
- Saw: A hand saw, circular saw, or jigsaw for cutting the wood to size.
- Drill: A drill with a variety of drill bits.
- Measuring tape:
- Pencil:
- Sandpaper: Various grits for smoothing the surfaces.
- Paint or stain: To enhance the appearance and provide protection (optional).
- Roofing shingles or weatherproof sealant:
- Entrance hole saw or drill bit:
- Optional: Wood filler for imperfections, and varnish or polyurethane for a protective finish.
Detailed Construction Steps
Step 1: Design and Prepare
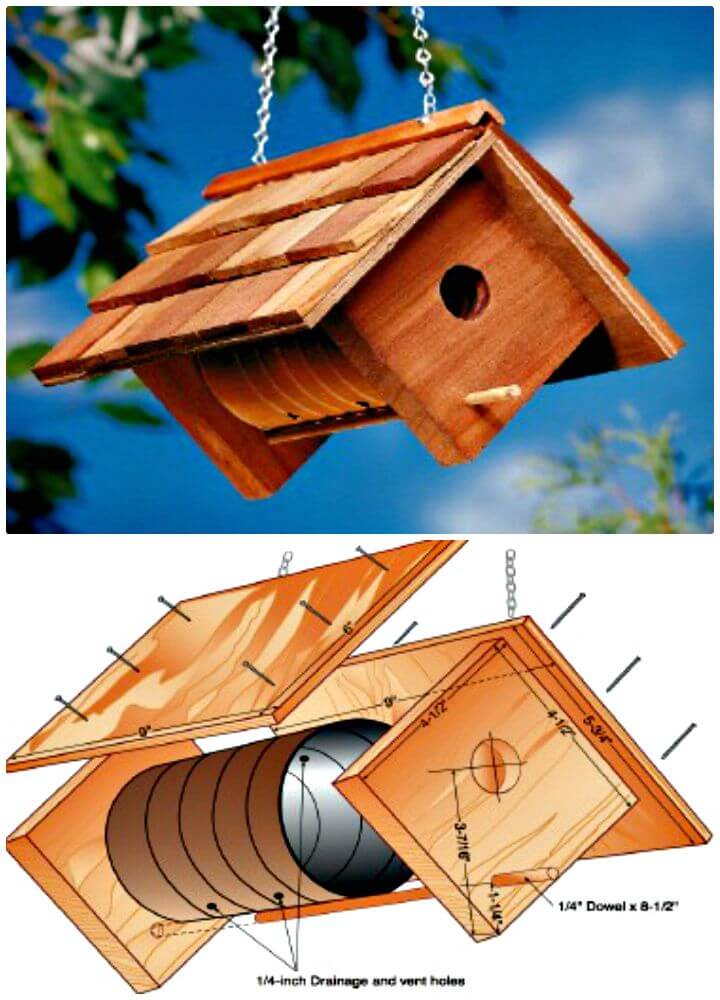
Before diving into construction, determine the desired dimensions of your birdhouse. Consider the bird species you wish to attract, as their size will dictate the entrance hole size and overall dimensions. A good starting point for a small birdhouse is approximately 6 inches wide by 8 inches tall and 6 inches deep.
After deciding on the size, create a simple sketch or diagram to visualize the birdhouse's shape. The low roof will be slightly angled, with the front edge being lower than the rear edge.
Step 2: Cut the Wood
Following your design, measure and cut the wood pieces using a saw. You'll need the following parts:
- Two front and back panels: Each panel will be the height of the birdhouse (8 inches) and the depth (6 inches).
- Two side panels: The side panels will be the width of the birdhouse (6 inches) and the height of the birdhouse (8 inches).
- One bottom panel: This will be the width of the birdhouse (6 inches) and the depth (6 inches).
- Two roof pieces: The roof pieces will be slightly longer than the width of the birdhouse (7 inches) and the desired depth of the roof overhang (2 inches).
Ensure that all cuts are precise for a smooth and stable assembly.
Step 3: Assemble the Birdhouse Body
Now, assemble the birdhouse body, excluding the roof.
- Apply wood glue to the edges of the front and back panels where they will meet the side panels. Secure them together with wood screws, ensuring that the screws are countersunk (flush with the wood).
- Attach the bottom panel to the assembled front, back, and side panels, using wood glue and screws.
- Once the body is complete, take the entrance hole saw or drill bit and carefully create the entrance hole on one of the front panels. The entrance hole size should be appropriate for the bird species you intend to attract. For smaller birds like chickadees, a 1 1/2-inch diameter hole is suitable. For larger birds, a 2-inch hole is recommended.
- Position the hole at the desired height, usually about 4-6 inches from the bottom of the house.
Step 4: Create the Low Roof
The unique low roof of this birdhouse is formed by attaching two roof pieces at a slight angle.
- Cut two roof pieces to the desired length (7 inches) and width (2 inches).
- Use a saw to cut a bevel on the front edge of each roof piece. The angle of the bevel will determine the pitch of the roof. A gentle angle, such as 10-15 degrees, is suitable for a low roof.
- Apply wood glue to the beveled edges of the roof pieces. Attach them to the top of the birdhouse, ensuring that the beveled edges are facing inwards. Use screws to secure the roof pieces to the birdhouse body.
- For added stability, you can attach a small piece of wood, called a ridge board, along the center seam of the roof. This will help to prevent the roof from sagging over time.
Step 5: Final Touches
- Sand all surfaces of the birdhouse, including the roof, using sandpaper of progressively finer grits. This will create a smooth finish and remove any rough edges.
- To enhance the appearance and provide protection, paint or stain the birdhouse. Choose colors that blend well with your garden environment.
- Apply roofing shingles or weatherproof sealant to the roof to create a watertight seal.
- To enhance the birdhouse's appeal, consider adding decorative details such as a small perch below the entrance hole.
- Optionally, you can fill any imperfections or nail holes with wood filler and sand it smooth after it dries.
- To add a protective coating, apply varnish or polyurethane to the birdhouse. This will help to protect the wood from the elements and keep the paint or stain looking fresh for years to come.
Placing and Maintaining Your Birdhouse
Once your birdhouse is complete, carefully select a location in your garden. Here are some key considerations:
- Sun and Shade: Choose a spot that receives partial sun and shade. Birds prefer locations that offer shelter from harsh sunlight and rain.
- Height: Mount the birdhouse at a height of 5-6 feet above the ground. This will deter predators and provide a safe haven for nesting birds.
- Orientation: Position the entrance hole facing away from the prevailing wind and rain. This will help to protect the birds from the elements.
- Predator Protection: To prevent predators from accessing the birdhouse, place it at a distance from trees or shrubs that could provide hiding places.
To ensure the longevity of your birdhouse, consider these maintenance tips:
- Clean Regularly: Clean the birdhouse twice a year, in the spring and fall, to remove any accumulated debris or parasites.
- Inspect for Damage: Inspect the birdhouse for signs of damage such as cracks, holes, or loose screws. Repair any damage promptly to ensure the safety of the birds.
By building a charming birdhouse with a low roof, you'll create an inviting haven for birds in your garden. The joy of watching birds nest and raise their young will be a rewarding testament to your woodworking efforts.
0 comments:
Post a Comment